About Robin Weinrich

Robin Weinrich is an award-winning jewelry artist and designer, creating and fabricating her original pieces since 1997. She began as a self taught artisan and then worked to refine her techniques with published artist, Pam East, in both enamels and metal clays. She works primarily with the precious metal clays in design and fabrication of her work. Using clays infused with fine silver, copper or bronze, she produces the design much like a potter would with clay. After refining the piece when it’s dry, it is then kiln-fired or torch-fired depending on its properties to burn off the clay binders and sinter the metals into 100% solid metal. Then she finishes the piece with traditional metal smith techniques. She also uses the ancient art of enameling to create unique, vibrant and colorful beads. Enameling is the art of fusing glass to metal and Robin uses a special technique to create each bead. Each bead is distinctive in color and pattern keeping to Robin’s philosophy of original work. She is also an artisan stone designer using natural stones, organics and metals to create one-of-a-kind pieces that honor color, shape and texture to highlight the natural beauty of these materials. Robin is inspired by all of the natural elements around us. Her work is distinctive and has earned her many awards as well as invitations and demonstrations of her torch work. Her philosophy centers on the idea that artisan jewelry should bring joy and festivity and to reflect the beauty of our world and the people in it.

Back in Business

Last weekend marked my return to the show circuit after missing out this past Fall season.  I appreciate all the warm prayers and comments regarding my health–I’m slowly on the path to full recovery.  Blessed by my CEO (hubby who Carries Everything Out), I am able to get back to my love for creating fabulous and joyful pieces to wear.  Lots of new ideas coming for the late Spring/Summer collection.  Winter in Georgia has been rough and unpredictable so I’m ready for warmth and sunshine!  Please continue to check my evolving show schedule for 2015.

I would also love to start a gallery of my customers who love their piece.  If you are so inclined, please send me your picture! I meet several of my return customers last week and they shared with me their continued joy of having one of my pieces.  Sometimes, though, because every piece is unique, I forget the exact look or what the piece was.  So, help me out and send me a few pictures.

Here are a couple of ladies from last year:

IMG_2037 IMG_2036

I will also continue to share some of my knowledge with this blog.  I believe that all artists should share their techniques and methods to inspire future artists.  Also, it’s always fun to see how your piece was fabricated and made special!

Hiatus

Well, my friends, just a quick note to let you know that I am officially on “hiatus” from my studio in order to have my knees replaced.  Wow, that sounds really weird, but something that I’ve been waiting for a very long time.  Without all the details, I was diagnosed at an early age with degenerative arthritis (after my third baby was born) and from then on it has been hard to manage.  The knees have been the hardest hit.  So much so, that I’ve had to be in a wheelchair this past year.  YUCK!  Not my best fashion look!

However, I have so many new ideas for my new collection that I hope to have ready by spring 2015.  I hope to hit the show circuit again and to reconnect with you, my artist friends and new clients.  Thank you for the support you’ve already shown me in the past!  

And, even if it is not for me . . .please support your local and independent artists–with the holiday season just around the corner we need to be sure that we fill our homes and give our gifts from the soul and creativity of so many people that produce their own art, soap, painting, jewelry, clothing, and the list goes on and on!  By supporting your local artist you are contributing to the great American dream of business and keeping our economy where it should be.  It is certainly my greatest pet peeve since becoming an artist over 18 years ago–I value each and every piece of art/product that I’ve collected over the years and I know what it means to put in the hard work and share it with others.  Please pass it on!

Thanks!

when-you-buy-from-an-independent-artist

The Art of Edutainment!

I just returned from the North Georgia mountains as the visiting artist for the weekend at Unicoi State Park & Lodge in Helen, Georgia.  One of the reasons I love being an artist is for times like this.  I am the only artist on site and I am able to demonstrate my enamel bead making for anyone who wants to watch.  Once I turn on the torch it seems to attract many eyes, especially those of children.  The flame dances across the copper tubing and while I apply layer and layer of glass, the whirling colors begin to show and the bead becomes alive.  After I turn off the torch, I explain what is happening to the bead as how the colors will continue to change as they cool.  I love what I do and I love to share my art with every one.  Bead upon bead was added to my small box to show and tell to others what I was doing there in the main lobby of the lodge.  I also have the opportunity to show off my current collection in the enamels, the metals and stones.  I am a gallery, a teacher, a sales person and an artist.

Many will disagree about demonstrating your art at a show or otherwise.  Once you make your pieces, some would say, then you should use the time to sell your work and talk about it.  While this may be fine for most folks who set hard-core goals for their sales, I certainly believe that there is room for more than that.  Some artists believe that you are the  “edutainment”  for the crowds of potential buyers for free.  As a teacher myself, I don’t see it that way.  I prefer to see it as a way to connect to potential customers about your work.  I know no one can repeat the kind of work I do, therefore I am not concerned about copycats.  However, I do want to share my gift and having a heart for learning, why not?  Certain shows are not an appropriate venue for demonstrating artists.  However, other shows or solo visits have advantages that you can’t use in the bigger shows.  You have time to talk and expand on your work with your demonstration.  You get to relate to something that customer is sharing and try to fit their need or desire with your work.  Even just getting the many comments of “how beautiful!”, “lovely”, or “I wish I had the money to buy your pieces” are part of an important process of feedback for your work.  For me, I work alone in all aspects of my design and fabrication.  It is great to get out to a show and hear that people “get” your work or how much they appreciate it.  Feedback is critical for anything you produce and as an artist, there is a part of you that is in every piece you make–of course, you want the warm fuzzies!

I often hear (especially in my art category), “did you MAKE this?” with an incredulous look on their faces.  Often, I just smile and start my usual dialogue of what I do and how I do it.  At a demonstration, the action certainly speaks for you.  Watching me complete a bead within 5-7 minutes and to see instant results of the raw bead, they really “get” my art!  And, I find they appreciate it even more.

Aside from the benefits of demonstrating my work, I have to admit that I also love the fact that I can produce enough beads in just one day’s demonstration for my next collection of enamel jewelry.  Not a bad trade-off to actually work and show off what you do AND be productive for your next season of shows.  Works for me!  I am blessed enough to be able to demonstrate my bead making two more times this summer–at the Butternut Creek Festival in Blairsville (July) and another gig at the Unicoi Lodge in Helen (August).  Maybe you can drop by and learn some art and we can talk and relate in a leisurely way.  Sounds like a great way to spend a hot summer day!

picking up enamels

I made 43 beads during this demonstration!

IMG_2581[1]

And the winner is . . .

. . . Black!  Yes, I am very pleased with my test shots for the gradient black backgrounds.  Much more polished and professional, which is important for securing a spot in a juried show.  Most juries have only 4 to 5 shots of your work, so it must stand out!  I struggle with showing juries my work in just 4 slides due to the fact that my work is extremely varied and unique.  While I’m happy with the black backgrounds, I still need to work on correct lighting.  My silver pieces seem washed out and they reflect easily.  Ways to reduce reflection include making a white poster board to house your item and cut a hole in it to allow your camera lens to “see”.  I like using the diffused light from the Modahaus Tabletop Photo Studio and their Steady Stand Kit.  These pieces are simple in design, yet ever effective.  You can learn more about their products at  www.modahaus.com

Here are a few of the successful shots from this week:

IMG_2485 IMG_2491 IMG_2499 IMG_2524 IMG_2557IMG_2496

You will probably note some of the various lighting attempts.  I will continue to hone these skills and play with natural light as well.  But, I love seeing the pieces against the black.  It works well for all the metal clays.


Photography Battles

Crucial to your work as an artist either on the show circuit, galleries, retail or wholesale is the clarity and beauty of your product through the picture.  Show applications want CD’s, files, actual prints, etc and if you have a website, an online store, or even just your smart phone, you’ll want those images crisp, clean and wonderful.  I nailed my photography style many years ago but my little ol’ Fuji point and shoot finally bit the dust last month.  This allowed me to reevaluate my photo process and what could I do to improve it.

Thus began the search for backgrounds, diffused lighting, natural lighting and ultimately how to use my own smart phone instead of getting a new camera to do the work I wanted.  I’ve had good success, but I’m still playing with backgrounds and lighting.  Here is a comparison “print” sheet to show the images  . . .

jewelry background comp

I’m leaning toward the natural light blue (lighter blue).  However, I’m not completely convinced . . .I am going to try for those high-end gallery shots that you often see especially on the high end art show websites.  This will be more black with diffused background lighting.  That will be the summer project, to make final decisions for showcasing my work.  I would recommend this post http://www.beadinggem.com/2013/09/how-to-use-your-smartphone-for-jewelry.html to help you get started exploring this type of photography.  There are several books out there, but you’ll find just as much information for free by digging through some web pages.

What works for you?

Hiatus and White Copper!

Well, I didn’t know I had been away from my blog this long!  I’ve had lots of non-business, non-jewelry stuff to do (and am still doing), so I thought I would update and try to at least post monthly!  However, during this period of time and one does very little, I have done a lot!

My most recent adventure in clay is working with the new White Copper–wow, and wow again.  It certainly has been fun to play with.  It’s consistency and features in clay are almost identical to the copper clay.  The one big difference is how you fire the White Copper.  It is recommended that you fire a Phase 1 in the kiln for about an hour on a wire mesh to burn out the organic binders.  Then on to a Phase 2 firing in the charcoal and pan.  After firing, you can do the usual metal smith work you would with the other metals . . .I like the shiny brightness after tumbling and then the matte finish as well.  Here is a bracelet and charm with a shiny finish.  It is certainly heavier than silver, but looks more like stainless steel–really neat texture and feel.

IMG_1944

So, this past week, I decided to combine the white copper with regular copper and was completely bedazzled!!  Here is a piece with the two metals side by side:

IMG_2200

Then I decided to blend the two clays together and see what the effect would be.  What was interesting to  me was that despite the product stating you must fire in two phases, I went ahead and fired the blended pieces according to the regular copper firing schedule.  It worked!  And, to test that theory even further, I misplaced a piece of solid white copper along with my regular copper peices (because they look so similar in the green ware stage) and fired it along with the copper and that piece was perfectly sintered and was just fine as the regular firing.  So, for me, I may only keep firing the white copper along with the regular copper.

IMG_2203 IMG_2202

As you can see, the first bracelet with the discs has two solid copper pieces and the other three are the blended copper pieces.  A very creamy metal color–some swirls of the copper are evident but all in all, it looks to me like soft pink tones throughout the metal.  Wonderful!  The second cuff bracelet is the solid white copper that fired with my regular copper in the kiln.  No evidence of any problems.  Solid and beautiful!

If you are following my blog, I will be the featured artist at Unicoi State Park in Helen, Georgia, June 14-15!  The summer collection will be available and I’ll be demonstrating my bead making technique with enamel glass and a torch.


A Little Piece of Me . . .

One of the more common questions I get while I on the show circuit is, “How can you let this be sold?”  That is really a multi-layered question for me, as I understand that when you look at my work, you know pretty quickly that each piece is handmade.  I am currently working on my sculpting and carving skills and this was one of the pieces I just made for the Fall shows.

DSCF7585

I used a branch from my yard (twig) and molded the clay and then carved out the leaves and the baby acorn and let them “attach” to the twig.  The curve in the copper came out beautifully as well as the overall finished look.  At yesterday’s show, a customer came in and she went directly for this bracelet and she was in love with it.  It was the right fit and color for her and she was very excited and joyful–which is my goal with each piece that I sell.  However, there was a small part of me that thought “Oh no, this is its first show . . really, it’s already going to go away?”  I know, crazy, right, because making sales is always one of my goals at shows.  But, I have found that the longer a piece stays with me in the collection and gets rave reviews for a few shows before it actually sells, gives me the time I need to accept it’s eventual departure from the collection to the person that I made the piece for.

So, to answer this question I would say that given time spent with a piece at each show, there comes a point when I’m ready to let go . .isn’t that true of life?  We spent 18 years with our children before “letting” them go on to college, careers, and moving out.  Are we ready then?  I expect we are, because not only have our children grown, so have we.  There are seasons in our lives that we prep for and then we are ready to live through them.  My jewelry work is very personal and I do give a lot of myself away in each piece.  But, I’m ready to.  My other goal at shows is to connect to people and to make them happy, whether through conversation, sales or both.  I pray for acceptance of the profit that is made at each show because I hope to trust God in His provision, and ultimately, it is His gift to me to have this creative talent.

If you happen to see me in this situation again (like I was yesterday), you may hear me say “oh, I just LOVE how this turned out” which is what I say many times anyway . . . but understand that anytime you buy a piece of legit handmade art–yes, you are getting a little piece of that artists’ heart and you are also participating in the journey each of us are walking through in life.  Hmmm, all this from my little twig bracelet!

Working in the Greenware Stage of Metal Clay

Dust, dust, dust, and more dust . . that is the biggest observation I make every time I refine my clay pieces after they are completely dry.  It is always best to spend a good amount of your work time on this stage as it is easier to correct minor flaws and to make the piece more refined and polished BEFORE it becomes hardened metal.  Trust me, after it fires, it becomes quite a different matter to change anything other than hammer it and bending it.

It is also an important way to salvage the metal dust and keep it for future paste that you may need.  As I designed this week I noticed that I am really going for a more sculptural look with my pieces.  I’ve always loved the 3D effect of combining pieces but now I’m really playing around with themes and such.  This picture shows you my latest copper piece that I made into a bib style necklace with florals . . . (dried stage)

IMG_1147

The branch underneath it will have some leaves that I cut out and will “paste” them onto the branch for a bracelet–I just finished sanding and refining all my copper pieces for this week and yeah, the dust will be embedded in my nails and cuticles for a few showers . . .

IMG_1146

But, I will say this again, all the dust, dirt, work, and refinement at this stage will truly pay off.  I would also be sure that you are quite familiar with your kiln and how your copper and bronze pieces will fire.  Many metal clay “gurus” talk about doing test strips and I agree.  You don’t want all the work you just spend on molding, forming, designing, refining, etc to simply burn away. However, it is not a perfect world we live in and you will certainly run into over firing, over loading, or simply didn’t make the piece right and you end up with blistering, powder or melted away pieces.  I have a special jar for these and some of them I’m thinking of hacking off the cracks and such and make a mosaic piece . . .  maybe next week.  This week I did several bronze pieces, and they came out of the kiln wonderfully and are now tumbling themselves to sleep tonight while my floral garden and other pieces are firing up all night tonight.  I hope that tomorrow when I open the kiln and dig into the carbon that the sculpted pieces survived.  You’ll see pictures, because that’s how excited I’ll be.

Finally, I have some silver pieces waiting to go next.  Prepping for a fine art show in Gainesville, GA the weekend of the 9/21st and I like to have some WOW pieces for the judges!  I’m afraid that the copper floral garden will be priced for the higher end customer due to the amount used.

Till next time and thanks and shout out to those of you following my blog.  My goal is to share what I do so that you can learn and maybe feel inspired!


Why I love doing Shows

I haven’t been on my blog lately as I’ve been busy preparing for all my Fall shows.  Not only that, but because of some medical issues, I have to have bed rest for at least half a day.  So, I’ve picked up my crochet needle and now I’ve made about 50 hats, 4 scarfs, 10 fingerless gloves and so on.  My new line is called “ThreadHeads” and I’ll premier these items on October 5 at a local show.  Just love keeping busy!

But I digress . . .why do I love shows so much?  I have taught many new artists about the show circuit and what it requires to run your business on the circuit.  Many artists do not do shows because of all the hard work, weather issues, or just not having enough help.  I have found that instead of galleries, retails stores and such, my work sells best at the show–and that is because I am actually interacting with clients and since my work is unique (no reproductions), I am able to see the person I made the piece for.  It is a joyful and wonderful moment when a piece of jewelry created and designed by my hand speaks to someone I have never met and it is perfect for them.  This happens all the time.  Not only does make shows fun for me, but I also love being around people.  When you work on your own and by yourself, sometimes that become hard to process and feel like your are creating pieces that will really make statements.  But, when I open up for a show, I am validated by all the happy comments and the “wows” and the “ahhs” and the general consensus that my work truly stands out.  That means I’ve made my mark in this industry.

And yet another reason, is that I get to meet some wonderful people on the circuit–mostly the artists who are my neighbors.  I am always praying that connections are made not only through my jewelry sales but also with the people I work with.  Some neighbors are just not happy people and complain about so much.  Yet most of the folks I know are so down-to-earth and truly creative in their own right with beautiful art.  I love when I can trade for pieces (especially for pottery) and I love bringing more of the handmade art into my home.  Not only do we support each other in our work, but we grow our local economy.  I only buy gifts from artists.  I only trade with artists.  Even on days when the sales are slow and the show seems to be a break-even or even just a marketing show, I still love what I do.  My desire to reach out and share my joy motivates me to keep on trucking through my chronic pain issues and my physical weaknesses.  And, when I do hit a low spot in my thinking and concern, God certainly validates to me that He is in control and that my work is important.  Jewelry is a personal expression.  It is something that allows us to tell the world who we are and what makes us happy just by wearing it.  And when it gets noticed, then we are able to not only smile but to also reach out to others.  It is the ripple in the pond effect.  And that is powerful enough for me to keep on liking my shows.

One day, I hope to become a promoter and run a show that artists will find viable and fun.  In our current economy we have much to watch out for, especially for promoters who don’t follow up and through on their promises and only wish to sell the “real estate” of the booth space.  Hopefully, the more shows you do and the more you talk to other artists, you’ll find the right shows for your product.  It is a learning experience even for veterans like me.  I still hit the shows that don’t work for me, but I meet lots of great people.  And again, in the economy, every show is now a gamble because we can no longer rely on the consistency of the buying public–especially for the arts, which is basically not a need for most people.

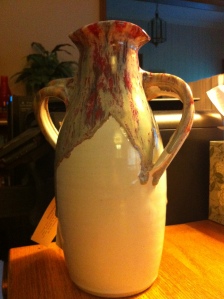
I hope to give shout-outs to artists I meet along the way and I’d like to start with this one–Roger Clark–a man who is a retired pastor and now preaches behind his potter’s wheel–impressive and exciting to hear what he does and to see his beautiful work . . . http://www.inthepottershand.org

Here’s my piece from Roger’s collection this last weekend:

IMG_1111

Working with Bronze Clay

Just back from a beautiful show in North Georgia and had good sales and lots of wonderful feedback on the collection.  I may have mentioned that one of my favorite metal clays is the FastFire Bronze Clay.  It’s texture is incredibly satisfying and it holds any kind of design I use and carve beautifully and rich with details.  While the traditional Bronze Clay still works well when I design, I find that the FastFire is just a better product.  One thing that you should be aware of with any of the metal clay is to keep it moist as you work with it.  If the clay dries too quickly you’ll lose the ability to design consistently or mold and sculpt as you want.  I use a combination of water and Cool Slip from my favorite website (www.cooltools.us) to keep clay moist.  After molding and sculpting these two bracelets and after they dried I noticed a few splits and cracks . . . these happen because either the piece is too thin or where the curve hits the design the clay is too thin and will split.  Here’s how I salvaged this problem:

First, you need to have a solid stone (not plastic, glass, or ceramic) mortar and pestle . . .

IMG_0996

Once pieces are dry, sanding is a very important step in smoothing edges and refining the piece BEFORE it become metal, where it becomes harder to get rid of mistakes, defects are sloppy work.  Here, in my beaker, I’ve collected bronze clay fine particles from the previous pieces I sanded.  You don’t need to much to make a paste.  Paste is one way of “healing” the cracks.  I also use a product called “Paste Maker” again, you can find this at the major metal clay sites.  Just a few drops and with my palette tool I mixed and pressed until I had a thick paste consistency that was very smooth:

IMG_0999 IMG_1001IMG_1004

After you are happy with the paste consistency, just take a brush and begin to apply in smooth strokes the paste over the cracks.  I hold my pieces up against a light to see if I’ve gotten all the cracks.  I also use my magnifier glasses–can’t do details work without them!  In this picture you can see where I applied the paste–I usually end up putting on several layers and then let dry.  Once it is dry, carefully sand down the texture to achieve a nice smooth back.

IMG_1005

Another method I use is to actually use flattened clay and then wet it around the edges and back and apply to the cracks.  I use this method if I want my piece to remain very thick (which is important in cuffs) or if the cracks are just really big.  Just use your fingers to flatten the extra clay and smooth it down around the edges, watching for complete coverage of the cracks.  It doesn’t have to be pretty because you’ll refine it with sanding after you’ve make the repairs.

IMG_0998

I’ve smoothed out the rough repairs with careful sanding and handling . . . while you might see some slight color variations that will go away after the firing.  Just make sure you smooth the back side professionally as this is what will rest against a client’s skin.

IMG_1007

Well, that it’s for this post . . .I’ll post my latest experiment with Bronze Clay next time and how it really came to life with the experiment!  Another one of a kind piece from the studios of Reflections!