Spring Collection

My Etsy shop is currently updated to include my new Spring collection pieces.  Just in time for Mother’s Day!

Feel free to share with friends and family.  My next show is May 21-22, 2016 at the Canton Festival of the Arts, Canton, GA.  Come and see me!

https://www.etsy.com/shop/reflections1?ref=hdr_shop_menu


Winter Hiatus

My winter hiatus has come a bit early this year, as I didn’t book any shows for the late fall/Christmas season.  Ah well, my choice and now it is the time for updating my skills, continued learning, and participating more actively within my field.  Specifically for me, that is metal clay art.  A new group has organized that makes me very excited.  It’s called the IMPACT Artist Project and here’s their mission statement:

IMPACT icon

“IMPACT Artist Project–The International Metal Clay Project Advancing Creativity & Talent is a non-profit Metal Clay arts community building and outreach program.  The mission of IMPACT and its philosophy stems from a generous attitude of giving and sharing which is overtly present in the Metal Clay arts community.  We have a developed a “team-like” program where IMPACT members, guilds, teachers, teaching facilities, and business work in conjunction to advance and strengthen the creativity, talent of its artists, and support healthy thriving businesses within our international Metal Clay community.”

What a great beginning to a form of organization and purpose.  I have often found that within the world of art, there are very few (beyond guilds)  standards, guidelines and professional guidance as one would see in a business setting.  I think that artists are underrepresented because they have no unifying voice.  I am thankful that the metal clay community is attempting to change that for our form of art.

I will continue to make this blog about my journey with metal clay and as a show circuit artist.  I love to share and teach and I hope that I will be more diligent is this task.  If you are a fellow metal clay artist, check out the website for IMPACT at http://www.impactartistproject.org and see how you can contribute or benefit from.

I am busy keeping my Etsy shop full for any Christmas shoppers and am also working on some custom pieces for Christmas gifts.  I love the challenge of custom work and hope that what I do pleases everyone involved.

Also, a task I don’t look forward to during winter hiatus, is the continued research and learning about upcoming shows and to schedule for 2016.  It starts early (as in right now) for many of the spring shows and even some fall and winter shows for 2016.


Paste, and more Paste, please

Spring has sprung again and that means time for my yearly collection of blossoms and leaves.  Still waiting on my dogwoods to bloom, but have started on some leaves for earrings.  When working with metal clay paste, you have to be sure your organic materials are strong and the ideal size for jewelry.  My collection every year begins with this one simple rule–collect multiple branches and blossoms and then find the right ones to work with back in the studio.  Of course, I work in volume during Spring for the whole collection of my organic pieces for my shows, so I have to make sure I have plenty of paste.

While you can always go the easier route and impress your organics into the clay itself, I find that using the actual organic in the process brings a nicer depth to the piece.  It does require patience and diligence to paste the 20+ layers of metal clay paste but the end results are worth it.

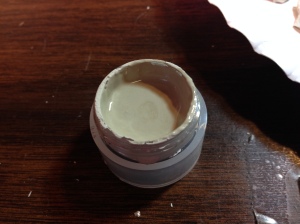
Because of the cost of the silver clay, I have learned to reclaim all my shavings, bits of clay that have hardened and pieces that just didn’t work for me before I fired them.  I keep an ongoing collection of my dust and powder from sanding pieces before firing. That’s some valuable silver in all that dust.  Keep it in a dry, air tight container so that you don’t collect dust and junk flying around our air.  When you have enough (I usually use about 6 oz or more of collected material) then you are ready to begin making the paste.  I always buy the ready made paste for each season and then I keep all the jars to use for my reclaimed paste.  Here’s the process:

Gather together the following tools:

Mortar and Pestle (for grinding and mixing), pallet blade, water, PasteMaker by Sherri Haub, Glycerin, by Cool Tools, empty jars for storing paste, mixing bowl with airtight lid (I use the Glad ware bowls) and your reclaimed dust!IMG_1829 (2)IMG_1830 (2)

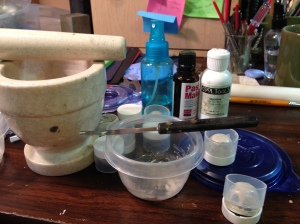
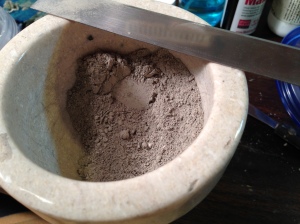
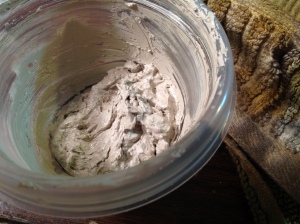
Your material will look like this when you start–lumps and broken clay pieces.IMG_1831IMG_1832

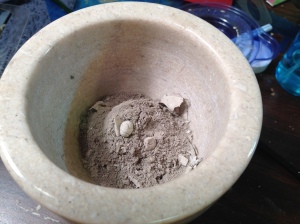
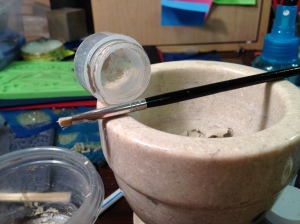
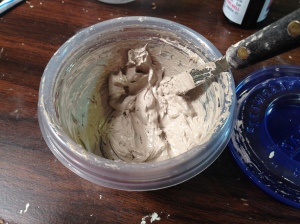
Keep grinding to reduce your material to powder or small particles.  Use a razor blade to help break down the small pieces into even finer pieces.

IMG_1834

Once you’ve achieved a fine powder, put in mixing bowl and add several drops of the PasteMaker as well as the Glycerin.  You can certainly use water (distilled) as well, but I find the glycerin makes the paste very smooth.IMG_1836

IMG_1837

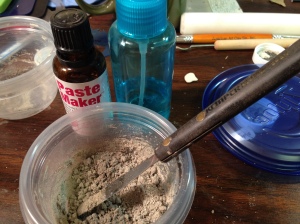
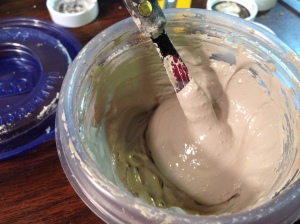
Keep adding the glycerin, the PasteMaker and/or water to keep developing the powder into clay.  Use lots of motion with your mixing and keep cutting into the paste with your blade.

IMG_1838

IMG_1839

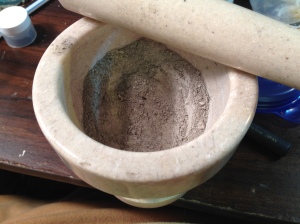
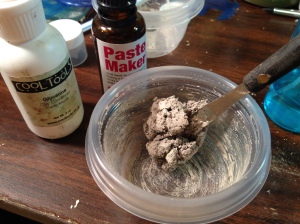
The mixture will eventually look like this–really work this with your blade–then you’ll see the paste getting better and better!  At this point, develop the paste to the consistency you want to work with–thinner or thicker–all based on the organic you are pasting to make this decision.

IMG_1842

IMG_1843

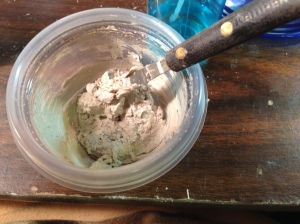
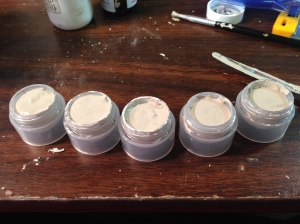
Once you’ve worked the paste to your chosen consistency–simply place the paste into your empty containers.  I don’t clean them at all–I just scrape out the leftovers to my powder mix and reclaim it all!

IMG_1844 IMG_1846

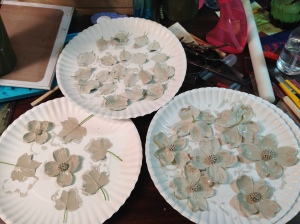
As you can see from the pictures below, I had several types of organic to work with. And plenty of paste to go around. Have fun and feel free to experiment as you now have more material to work with that you already purchased!
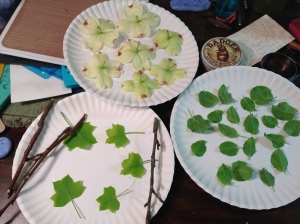
IMG_1816IMG_1818 (2)

And that tool goes there . . .

After being on Hiatus for a while and getting back into my workshop/studio I realized it was time for an update.  I’m all about organized space and this is especially true in the studio.  There are just too many things that I use that need to be convenient and connected to my work flow.  Being a mid-level manager for many years in corporate America, it was critical to keep all my files, resources and more in the perfect spot in my offices so that I could be my most efficient.  While my middle initial is “E” and stands for my middle name “Eve”, I most often refer to it as standing for “Efficient”. . . .that’s just how my brain works when it comes to work!

When we moved into our new house several years ago, I was beyond thrilled to have a dedicated space for my workshop.  We are blessed with a large finished basement that we have all broken up into “creative areas”–my husband’s wood working tools and sawdust, my MIL’s office and sewing area, and my studio.  Basically, I extended my current setup to include double the space and work surface area.  Most important for me was the ability to have my kiln in the studio with me, yet in an open space to allow for heat “space”.  I was able to include another table and keep my photo area still next to the one window.  I began my jewelry making area in the corner of my very small kitchen at my old house and I used a large part of the back porch for firing torches and kilns.  To have everything in one area for me is luxury at its best for my work.  The only thing I would ever add is a work sink but with no plumbing in our basement that’s something I’ll have to do without.  But I make it work with my “wash tub”, rags and distilled water.

Here are some views of the improved space:

IMG_3393

Here is the entry into my space . . .my brag wall is important to remind my of past success and to keep me focused on doing my very best with each piece.  My main work station is the table with extra lighting for those very small details when fabricating and assembling my pieces.


IMG_3394

As you go past my work table you’ll note the extra shelves for my clay work and an idea board on the wall.  My great window which gives me great light for my photography.  Another board up on the wall into my new space.


IMG_3395


Over to the left of my studio space . .more shelves–can never have enough.  I love the ability to see all of what I have since I collect so many things over the past years to use.  The tall shelf is basically current work stuff–my resources, office supplies, pricing materials, and working trays of pieces.  The shorter white shelf and the table next to it is my sanding station/cleaning station.  I do all my sanding of metal clay away from the primary work space due to the dust and and mess.  I keep separate sanding sponges, cloths and sticks for each metal clay so not to mix the dust particles.  I also collect the shavings to make into paste and more clay (especially the silver).

IMG_3396

A closer look at the photography station.  Most of it is just sitting there.  The exact set up includes using the light boxes and lights and different backgrounds.  I use the materials from  Modahaus Tabletop Studios.  A truly compact and simple set up along with a good photo app from my IPhone.  I used to use a basic digital camera, however the new technology and the camera apps are quite cost effective and give you great shots.  Just be sure to learn all you can about positioning and lighting your work as well as know what your camera can do.  If this is your business, you need to understand that photos of your work are the only representation you have to jurors and buyers.  Photos can make or break your appearance.


IMG_3397


This was my most important update, to have my firing supplies within the studio.  I added this table to the backside of my space and left it wide open to give the kiln free space at it heats up to 2350 degrees!  My tumbler, charcoal pans, enameling stands all make up the rest of the table space.  Another reason for a separate work area for firing gives me space as the charcoal firings can be messy with the dust.  Also, freedom to work my handheld torch with my enameling into metal is important.

So, here is a glimpse of my work space and where I dream, design and do!  Everyone has unique spaces and unique work habits that are just right for you.  In fact, a funny aside from my corporate days.  I was the training coordinator for my area and had dedicated space to conduct the training classes.  One day, setting up for a new class, I was walking around the room with a Kleenex box looking for the perfect place to set it.  My HR friend walked by and was questioning me about why I was taking this task so seriously.  I remember stating to her that there is a spot for everything and that your space and how it was arranged makes a big difference in how your learn.  She simply smiled and shook her head.  Understanding the importance of space and where things work best it not simply a fantasy.  It is a skill that you can learn and an important part of your productivity.  While you could argue that “my messy office works for me”, one only has to look at your production and results to determine if that really is true.  For me and my creative muses, my studio/workshop works for me!

Back in Business

Last weekend marked my return to the show circuit after missing out this past Fall season.  I appreciate all the warm prayers and comments regarding my health–I’m slowly on the path to full recovery.  Blessed by my CEO (hubby who Carries Everything Out), I am able to get back to my love for creating fabulous and joyful pieces to wear.  Lots of new ideas coming for the late Spring/Summer collection.  Winter in Georgia has been rough and unpredictable so I’m ready for warmth and sunshine!  Please continue to check my evolving show schedule for 2015.

I would also love to start a gallery of my customers who love their piece.  If you are so inclined, please send me your picture! I meet several of my return customers last week and they shared with me their continued joy of having one of my pieces.  Sometimes, though, because every piece is unique, I forget the exact look or what the piece was.  So, help me out and send me a few pictures.

Here are a couple of ladies from last year:

IMG_2037 IMG_2036

I will also continue to share some of my knowledge with this blog.  I believe that all artists should share their techniques and methods to inspire future artists.  Also, it’s always fun to see how your piece was fabricated and made special!

The Art of Edutainment!

I just returned from the North Georgia mountains as the visiting artist for the weekend at Unicoi State Park & Lodge in Helen, Georgia.  One of the reasons I love being an artist is for times like this.  I am the only artist on site and I am able to demonstrate my enamel bead making for anyone who wants to watch.  Once I turn on the torch it seems to attract many eyes, especially those of children.  The flame dances across the copper tubing and while I apply layer and layer of glass, the whirling colors begin to show and the bead becomes alive.  After I turn off the torch, I explain what is happening to the bead as how the colors will continue to change as they cool.  I love what I do and I love to share my art with every one.  Bead upon bead was added to my small box to show and tell to others what I was doing there in the main lobby of the lodge.  I also have the opportunity to show off my current collection in the enamels, the metals and stones.  I am a gallery, a teacher, a sales person and an artist.

Many will disagree about demonstrating your art at a show or otherwise.  Once you make your pieces, some would say, then you should use the time to sell your work and talk about it.  While this may be fine for most folks who set hard-core goals for their sales, I certainly believe that there is room for more than that.  Some artists believe that you are the  “edutainment”  for the crowds of potential buyers for free.  As a teacher myself, I don’t see it that way.  I prefer to see it as a way to connect to potential customers about your work.  I know no one can repeat the kind of work I do, therefore I am not concerned about copycats.  However, I do want to share my gift and having a heart for learning, why not?  Certain shows are not an appropriate venue for demonstrating artists.  However, other shows or solo visits have advantages that you can’t use in the bigger shows.  You have time to talk and expand on your work with your demonstration.  You get to relate to something that customer is sharing and try to fit their need or desire with your work.  Even just getting the many comments of “how beautiful!”, “lovely”, or “I wish I had the money to buy your pieces” are part of an important process of feedback for your work.  For me, I work alone in all aspects of my design and fabrication.  It is great to get out to a show and hear that people “get” your work or how much they appreciate it.  Feedback is critical for anything you produce and as an artist, there is a part of you that is in every piece you make–of course, you want the warm fuzzies!

I often hear (especially in my art category), “did you MAKE this?” with an incredulous look on their faces.  Often, I just smile and start my usual dialogue of what I do and how I do it.  At a demonstration, the action certainly speaks for you.  Watching me complete a bead within 5-7 minutes and to see instant results of the raw bead, they really “get” my art!  And, I find they appreciate it even more.

Aside from the benefits of demonstrating my work, I have to admit that I also love the fact that I can produce enough beads in just one day’s demonstration for my next collection of enamel jewelry.  Not a bad trade-off to actually work and show off what you do AND be productive for your next season of shows.  Works for me!  I am blessed enough to be able to demonstrate my bead making two more times this summer–at the Butternut Creek Festival in Blairsville (July) and another gig at the Unicoi Lodge in Helen (August).  Maybe you can drop by and learn some art and we can talk and relate in a leisurely way.  Sounds like a great way to spend a hot summer day!

picking up enamels

I made 43 beads during this demonstration!

IMG_2581[1]

Rain, Bronze and Crochet?

Just a few thoughts this morning as I contemplate the fall collection.  We’ve had so much rain these past few weeks that instead of living in the deep South, maybe I’m really living in the Amazon rain forest.  But of course, if I start thinking along those lines, I start feeling some new inspiration with the new designer stones that I just got in for the fall collection.  Lot’s of rich colors, deep hues and fabulous shapes.

However, bronze clay work is taking over my workshop this week.  I’ve finally decided that I much prefer the Fast fire Bronze Clay the best as it takes textures so well.  I’m playing around with some abstract florals on one of the bracelets and on another bracelet I’ll be playing around with torching the metal for color changes.  Pictures will follow!

Today, I plan on putting up a video of how I make my enamel glass beads.  It’s a rough video as I don’t like playing around with editing, but you’ll see the process.  Enameling continues to surprise me as each bead is made.  Here’s a sample of the last set of beads in their designs:

Image

Be sure to check out the video of the my process in making these beads.  Click on the upper tab for “Videos”.


With all the rain, and sometimes my lack of work in the workshop, I’ve picked up another hobby of mine . . . crocheting!  It has satisfied my need to work with my hands and I’ve loved making all kinds of hats and fingerless gloves . .here are some samples.  I might have to set up a booth to sell all of these by Fall!

IMG_0927 IMG_0959 IMG_0971

Well, it is not raining now, so off to the workshop to sand some bronze and make a few silver rings. 

Working with Organics

I’ve shared a little about how I do my leaves and flowers, but thought I would share my success in the studio from this morning.  One of my absolute favorite techniques is working with the metal clay and pasting it to a consistency that works for whatever organic I am using.  There are many things to consider . . so here’s what I did today:

leaves

First step is to find those treasures in nature.  I picked a couple of small branches from my apple tree (crab apple, I believe) and put them in water immediately.  You want your organic piece to be as fresh as possible.  If you are driving along, bring some paper towels and plastic bags for things you find.  You can wet the towel in the bag and keep the flower or plant going till you get home.  I often do this on my travels to and from shows.  I’ve picked up moss, cotton bloom, cotton leaves, acorns, pine cones and such.

leaves 1

Next, you want to pick the best of the bunch you are working with.  For this round, I was looking for the smaller baby leaves to use for earrings and rings.  Then I picked a couple of larger leaves for pendants.  As I’ve said before, spring is the best time to pick flowers and leaves.  They are new, strong and fresh.  You want leaves that are strong and I like keeping the stem to use as my holder as I paste the leaf.

leaves 0

I begin with a light coat of really watered down paste so I can see what the leave will do.  Some leaves are just not cooperative–those that have VERY high finish/glossy (like magnolias) or leaves with lots of fuzzy surfaces.  This leave always does well as it has a nice textures with lots of vein structure.  Work with the natural folds of the leaf as you continue the layers, because as the leaves dry, they will begin to curl–you can work with some curl, but if it curls too much you risk cracking the paste as it drys.

leaves 2

I ended up putting about 4-5 layers on these this morning.  I used my cup warmer and put my paper plate right on it to speed up the drying process so I could do more layers.  The quicker you begin the layers, while fresh, the better the results.  Paper plates are GREAT and are easily moveable in the studio space.

dogwood on warmer  IMG_0840  IMG_0845

Back to work on my dogwoods for last week.  I decided to put on a few more layers and dried them on the warmer.  Then I began my hand torch work.  I’ve actually did a video of this and will post it later this weekend so you can actually see the action.  It is important to keep things safe, so I put my firebrick on my tile which is then on a pottery turn wheel so I can move the whole thing easily while torching.  I use a small, hand butane torch.

IMG_0846  IMG_0850  IMG_0849

After firing, let it cool and then test it against glass to make sure the silver is solid.  You’ll hear that lovely “ding” sound and all is good!  I use a medium and small steel brush to gently brush away ashes, flecks and the white from the pasting–you’ll reveal the silver when you do this.  Some folks like to leave use this technique for a matte finish, which is fine.  But I like working with glossy finishes and for me, tumbling the silver gives it strength and you can be sure all the paste and ashes are gone.  I also love the dogwood flowers, because if you’ll look closely at the third picture above, you’ll see the honeycomb like texture of the burned out seed pods.  Cool!

IMG_0851

They are now all getting a bath in some steel shot, burnishing fluid and water in a my heavy duty tumbler.  I am going to let this tumble for most of the day and then we’ll see what happens next!  Look for my video in my next post!

Springtime Beauty

I often find many of my organic pieces in the spring when they are fresh and new. It is best to work the clay into a paste that matches or is supported by the actual item you want to make. This process takes time, patience and practice! It is almost intuitive when you have to decide just how many layers a piece will take.  Dogwoods are one of my favorite flowers to work with.  This year, instead of picking just one or two larger ones, I went earlier and picked about 9 really strong “baby” ones.  I find that using distilled water and glycerin will thin down the paste really well–but you have to keep it mixed thoroughly.  Also, in these slow economic times, I save all my silver “sawdust” and make paste out it.  This last batch made up about 6 oz which saved me over $180 in supply!  But, it took time and patience to get the consistency right and the paste smooth.  Also, be sure to have the right brushes to really apply the paste in all the nooks and crannies of an organic piece.

IMG_0774

This shows you the current collection of dogwoods I am working on.  I paste one to two layers each time I’m in the studio.  You can speed up the drying process by putting on a cup warmer and then paste again.  How many layers?  Well, until you feel that it will be strong enough during firing!  That’s the art part, not the scientific answer.

IMG_0776

Here are my lenten roses from our new yard that I thought I would try.  Much larger and the first couple of layers of paste didn’t take well–but I pressed on and kept working it and after you get about 4-5 layers of dried paste, it becomes easier to bulk it up.

I’m still working on these pieces but here is one of the roses that I finished for the last show . . .

az

I hand torch the organic pieces to control the amount of time and burn and also do some flattening in the process to make sure the finished piece doesn’t have sharp curves or edges–also filing after firing helps in this area.  I don’t drill a hole until it is tumbled after firing to harden the actual metal.  With this rose, I oxidized with coffee and liver of sulfate!  Awesome midnight colors came to surface with a light polish and paired with a black steel hammered chain.

If the organic makes it to the show looking like this . . . well . . springtime beauty is well worth the wait in my opinion!

Welcome to my world of art and jewelry!

Image

I plan to share with those that are interesting about my process and journey as an artist and how I love to design and create interesting and one-of-a-kind pieces.  My goal is to bring joy in all my work and to share what I learn and pass that knowledge on.  I hope you will enjoy being a part of this journey and thanks for being interested!  By the way, this is one of my pieces from last year which proved to me that I simply cannot sketch my designs–my work is very organic and I’ve learned how to keep it that way.  More about my processes in future posts!